
Hot Foiling: What Has Been On The Back Burner

Have I got a story for you…
Yes, bottle painting is still underway this summer. This one above was done with a tutorial by @juniper.calligraphy. It’s cute, right?
But, there’s something else that I have had on the back burner for a while now that needed my attention. That is, hot foiling using a wood burner.
The Backstory
I’ve had my Truart burner for a little over a year now. I got it after seeing some of the calligraphers on the gram using them to burn calligraphic designs into wood. Looked like fun!
Later, I became enamored with the fact that these wood burners could be used for hot foiling too.
But, mine didn’t work properly. At times, I could get a piece done. But, most times, my projects just wouldn’t work out well. For some reason, the heat would not remain consistent with my burner. Frustrated, I shelved it, thinking I would circle back around to it later.
Fast forward to last week and I found myself with two burners sitting on my living room floor.

Crazy, right?
The Back(up) Burner?
After ruining five luggage tags a few weeks ago, I contacted Truart, desperate to figure it out. They performed some tests with me over the phone and agreed my burner shouldn’t have been jumping around on its heat settings. They were so awesome, they offered to repair or replace it!
Buuuutttt….I just didn’t want to give it back—not if it was something that could be helped.
In the meantime, I checked out some YouTube videos by pyrographers to see what burners they were using. I found the Colwood Detailer to be a favorite amongst pyrographers. The recurring theme I kept hearing was consistent heat. I reached out to one of them to get her take on if the Colwood Detailer could be used for hot foiling. Although she hadn’t tested foil yet, it was on her to-do list.
So, I bought it. I figured I had a backup engraver. Why not a backup burner too? 🤷🏾♀️
Unfortunately, right out the box, the Detailer burned right through my foil, even at its lowest setting. 😫
And then things got interesting…
I bounced back to the Truart again and took a suggestion from my husband to plug it in downstairs. Lo and behold, it worked! The heat was consistent and I could burn for 45 minutes or more without it getting dicey on me. Finally!

In the meantime, I still couldn’t get the Detailer at a heat setting I needed to work on foil. It was just so hot. I actually felt it would be too much for what I needed.
The Trim Pot/Tuning Pot
Then, in what must’ve been a rare moment of genius, I thought about how the Truart has a Tuning Pot on the front of the device to calibrate its heat. I wondered if the Detailer had the same.
I went to the library of Google to find out if there was a setting that would adjust the temperature of the Detailer.
Turns out, there was! However, Colwood calls it a ‘trim pot’.
Now, I had to open up the brand new burner to get to it. 😳 But, after I adjusted the trim pot, I found I was able to foil with it!
Look at these results below.

Which Is Better?
So, which is better?
I can’t tell you that…Depends on your needs and preferences. I can tell you that both work beautifully, but I am definitely using one more than the other. ☝🏾
You want to know which? Alright! Let’s compare!
In the side by side photos, the Truart Wood Burner will be on the left and the Colwood Detailer on the right.
At first sight, it looks like the Truart unit is bigger. It is. But not because of the heating unit.

Both heating units appear to be close in size, at least to my eye. What I think gives the Truart burner slightly more of a footprint is the pen holder. It has its own, connected and yet stand-alone holder (see the first photo of the burners above) for protection while it is hot. It also just looks really cool when the pen is red hot. 😎
On the other hand, the Colwood Detailer’s pen is very no frills. It just snaps into the prongs on the top of the heating unit. The pen is a bit more exposed up there, but it is a much simpler design overall.
The Pen
Speaking of which, the pens themselves are also built differently.

The Truart pen is comfortable to hold with a larger barrel than my typical pens. It feels slightly more marker-like for me. The size of the barrel interferes minimally with writing when I use it.
The Detailer has a cork barrel that, to my hand, feels lighter and a little more pen-like overall. Colwood pens also have a fixed tip option. I personally like the replaceable tip system since one can hold the pen closer to the tip. Read more about the pen system here.
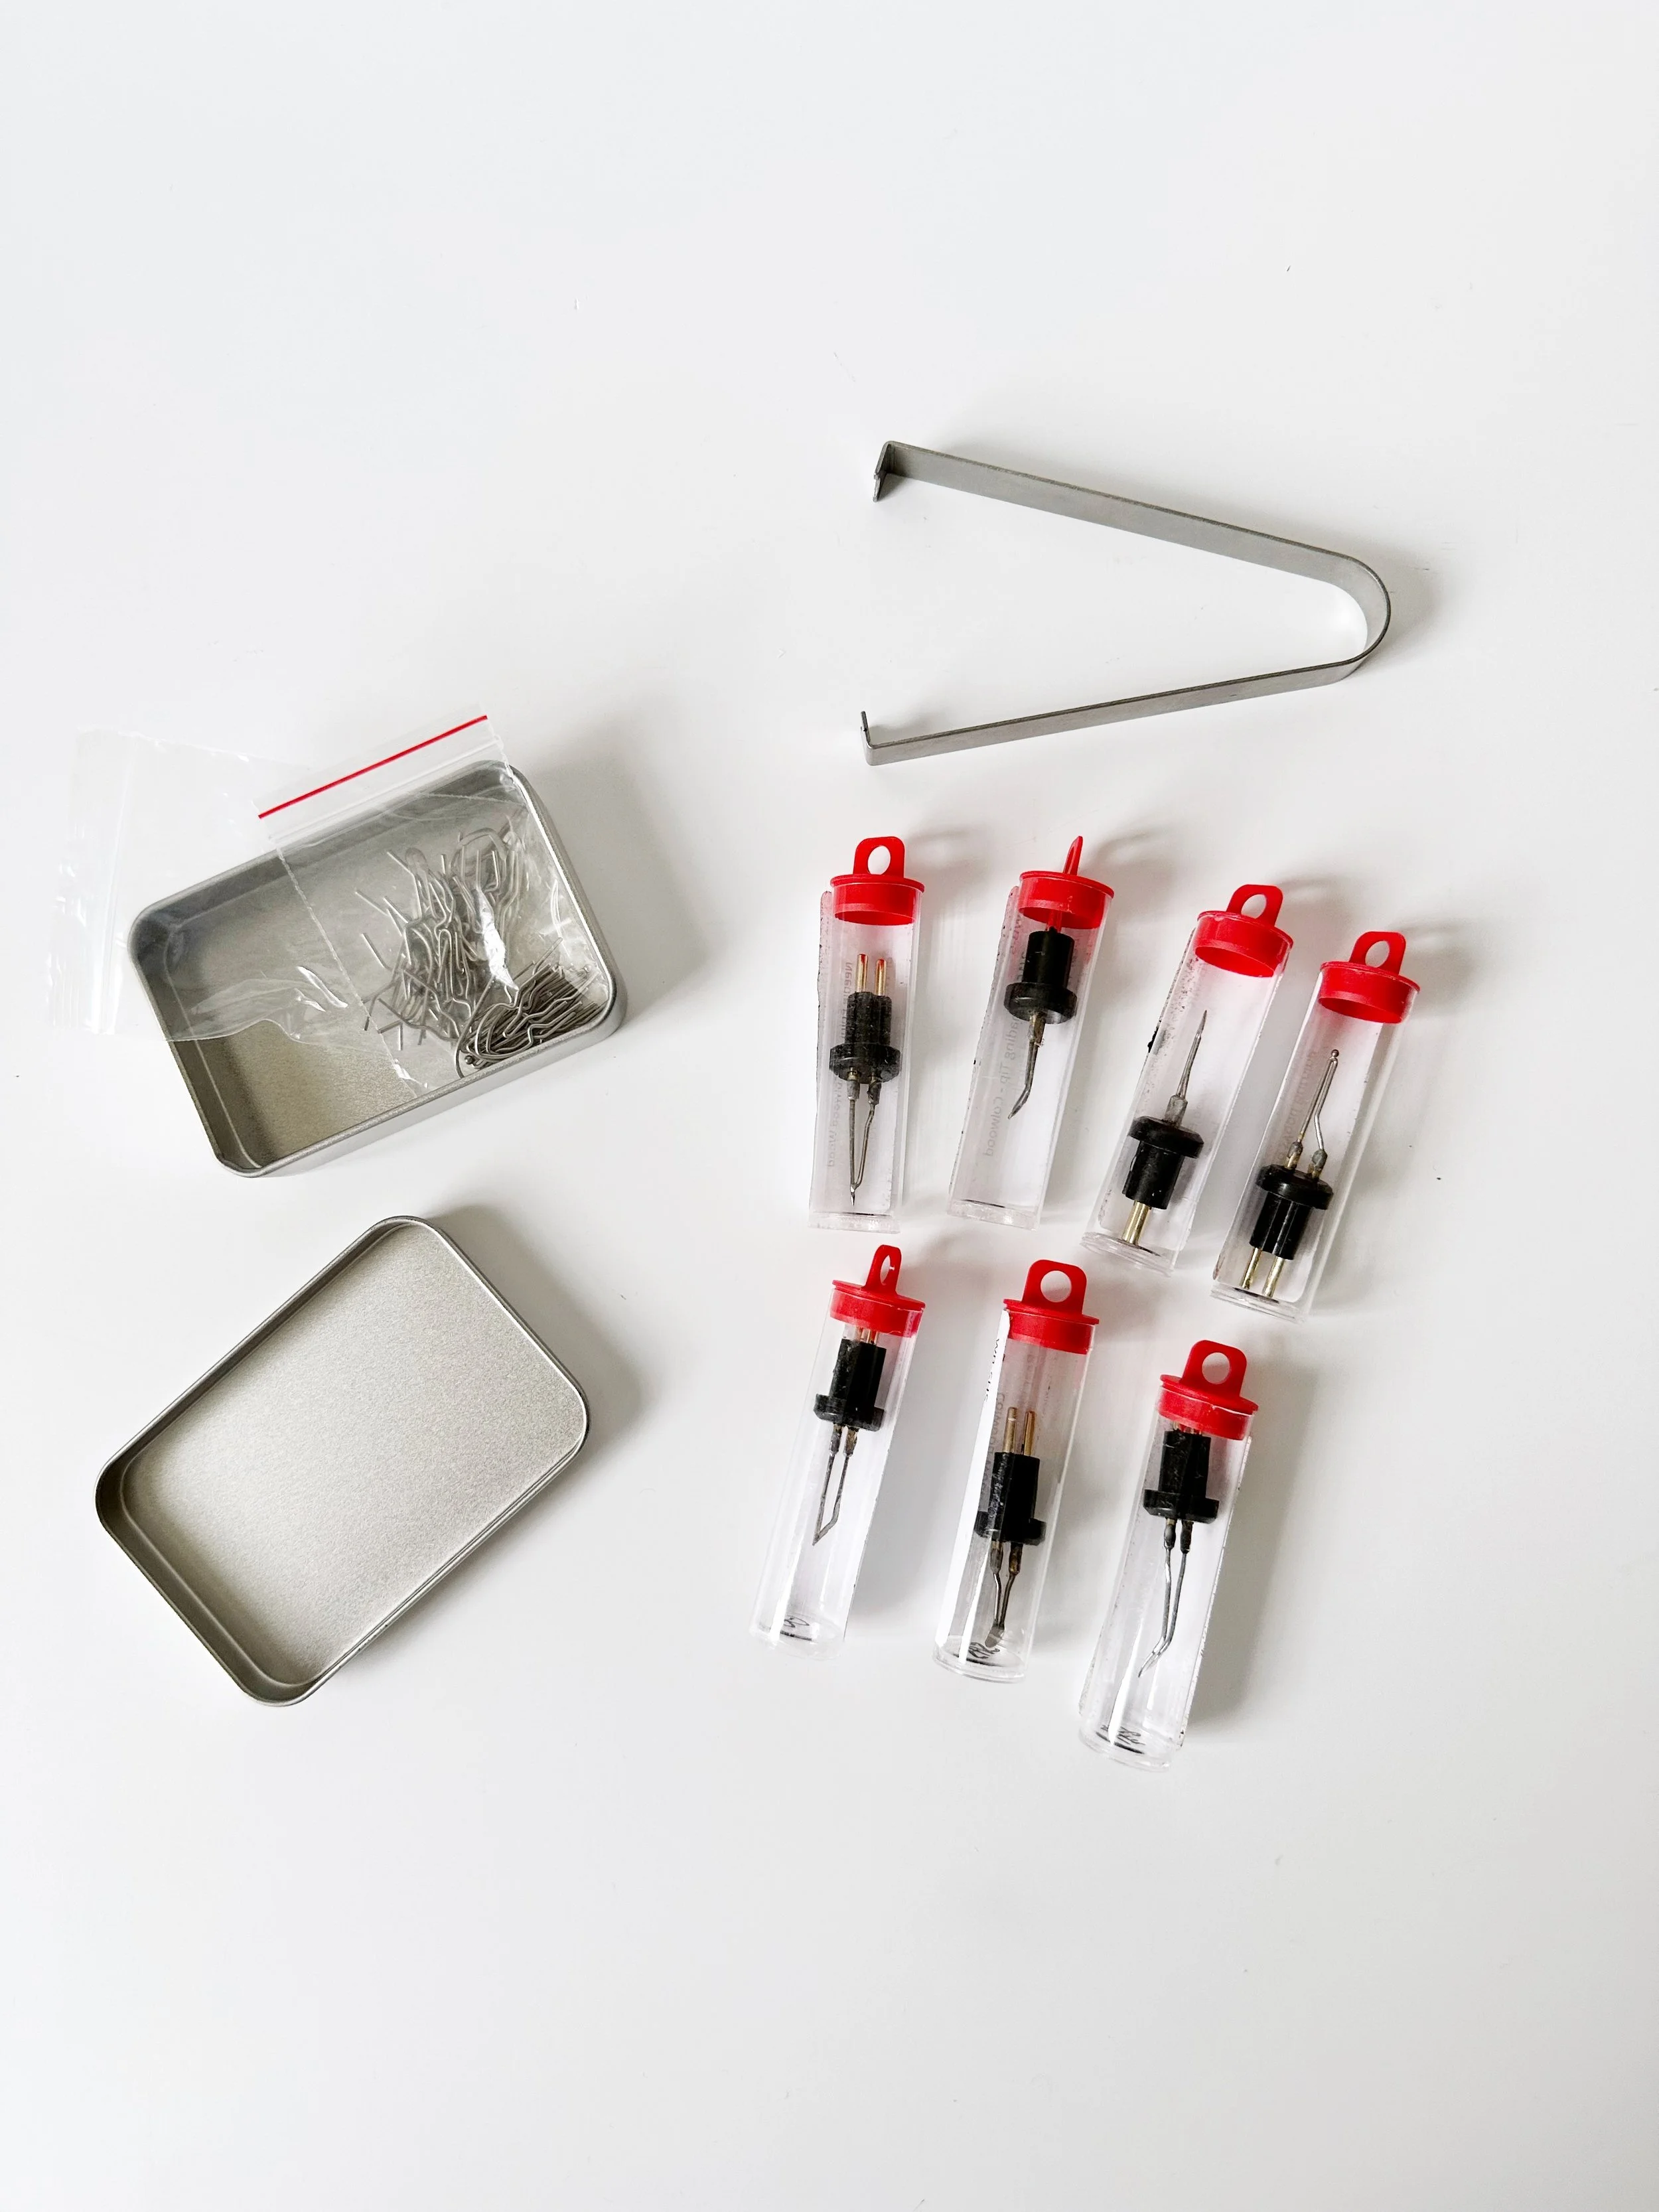
Tips
Both pens have interchangeable tips. However, the Truart came with more tips in the shipment than the nine tips (there are seven in the photo below) that came with the Detailer Kit that I ordered. Many of those Truart tips are duplicates. But, it is still worth mentioning since tips do not last forever and will need to be replaced.
I do feel the Colwood tips seem a little heartier than the Truart tips. But, it’s possible that how long the tips last between the two could be a wash since you get so many with Truart.
Also, the Detailer comes with a clamp to help remove the tip after use. Though there were needle nose pliers that came with the Truart to tighten and loosen the end caps on the pen where you insert or remove tips (also not showing below), I often don’t use them to remove the tips. I just use my fingers. I do use them to tighten, however.
Digital vs. Analog
Next up, is the heat level indicator.
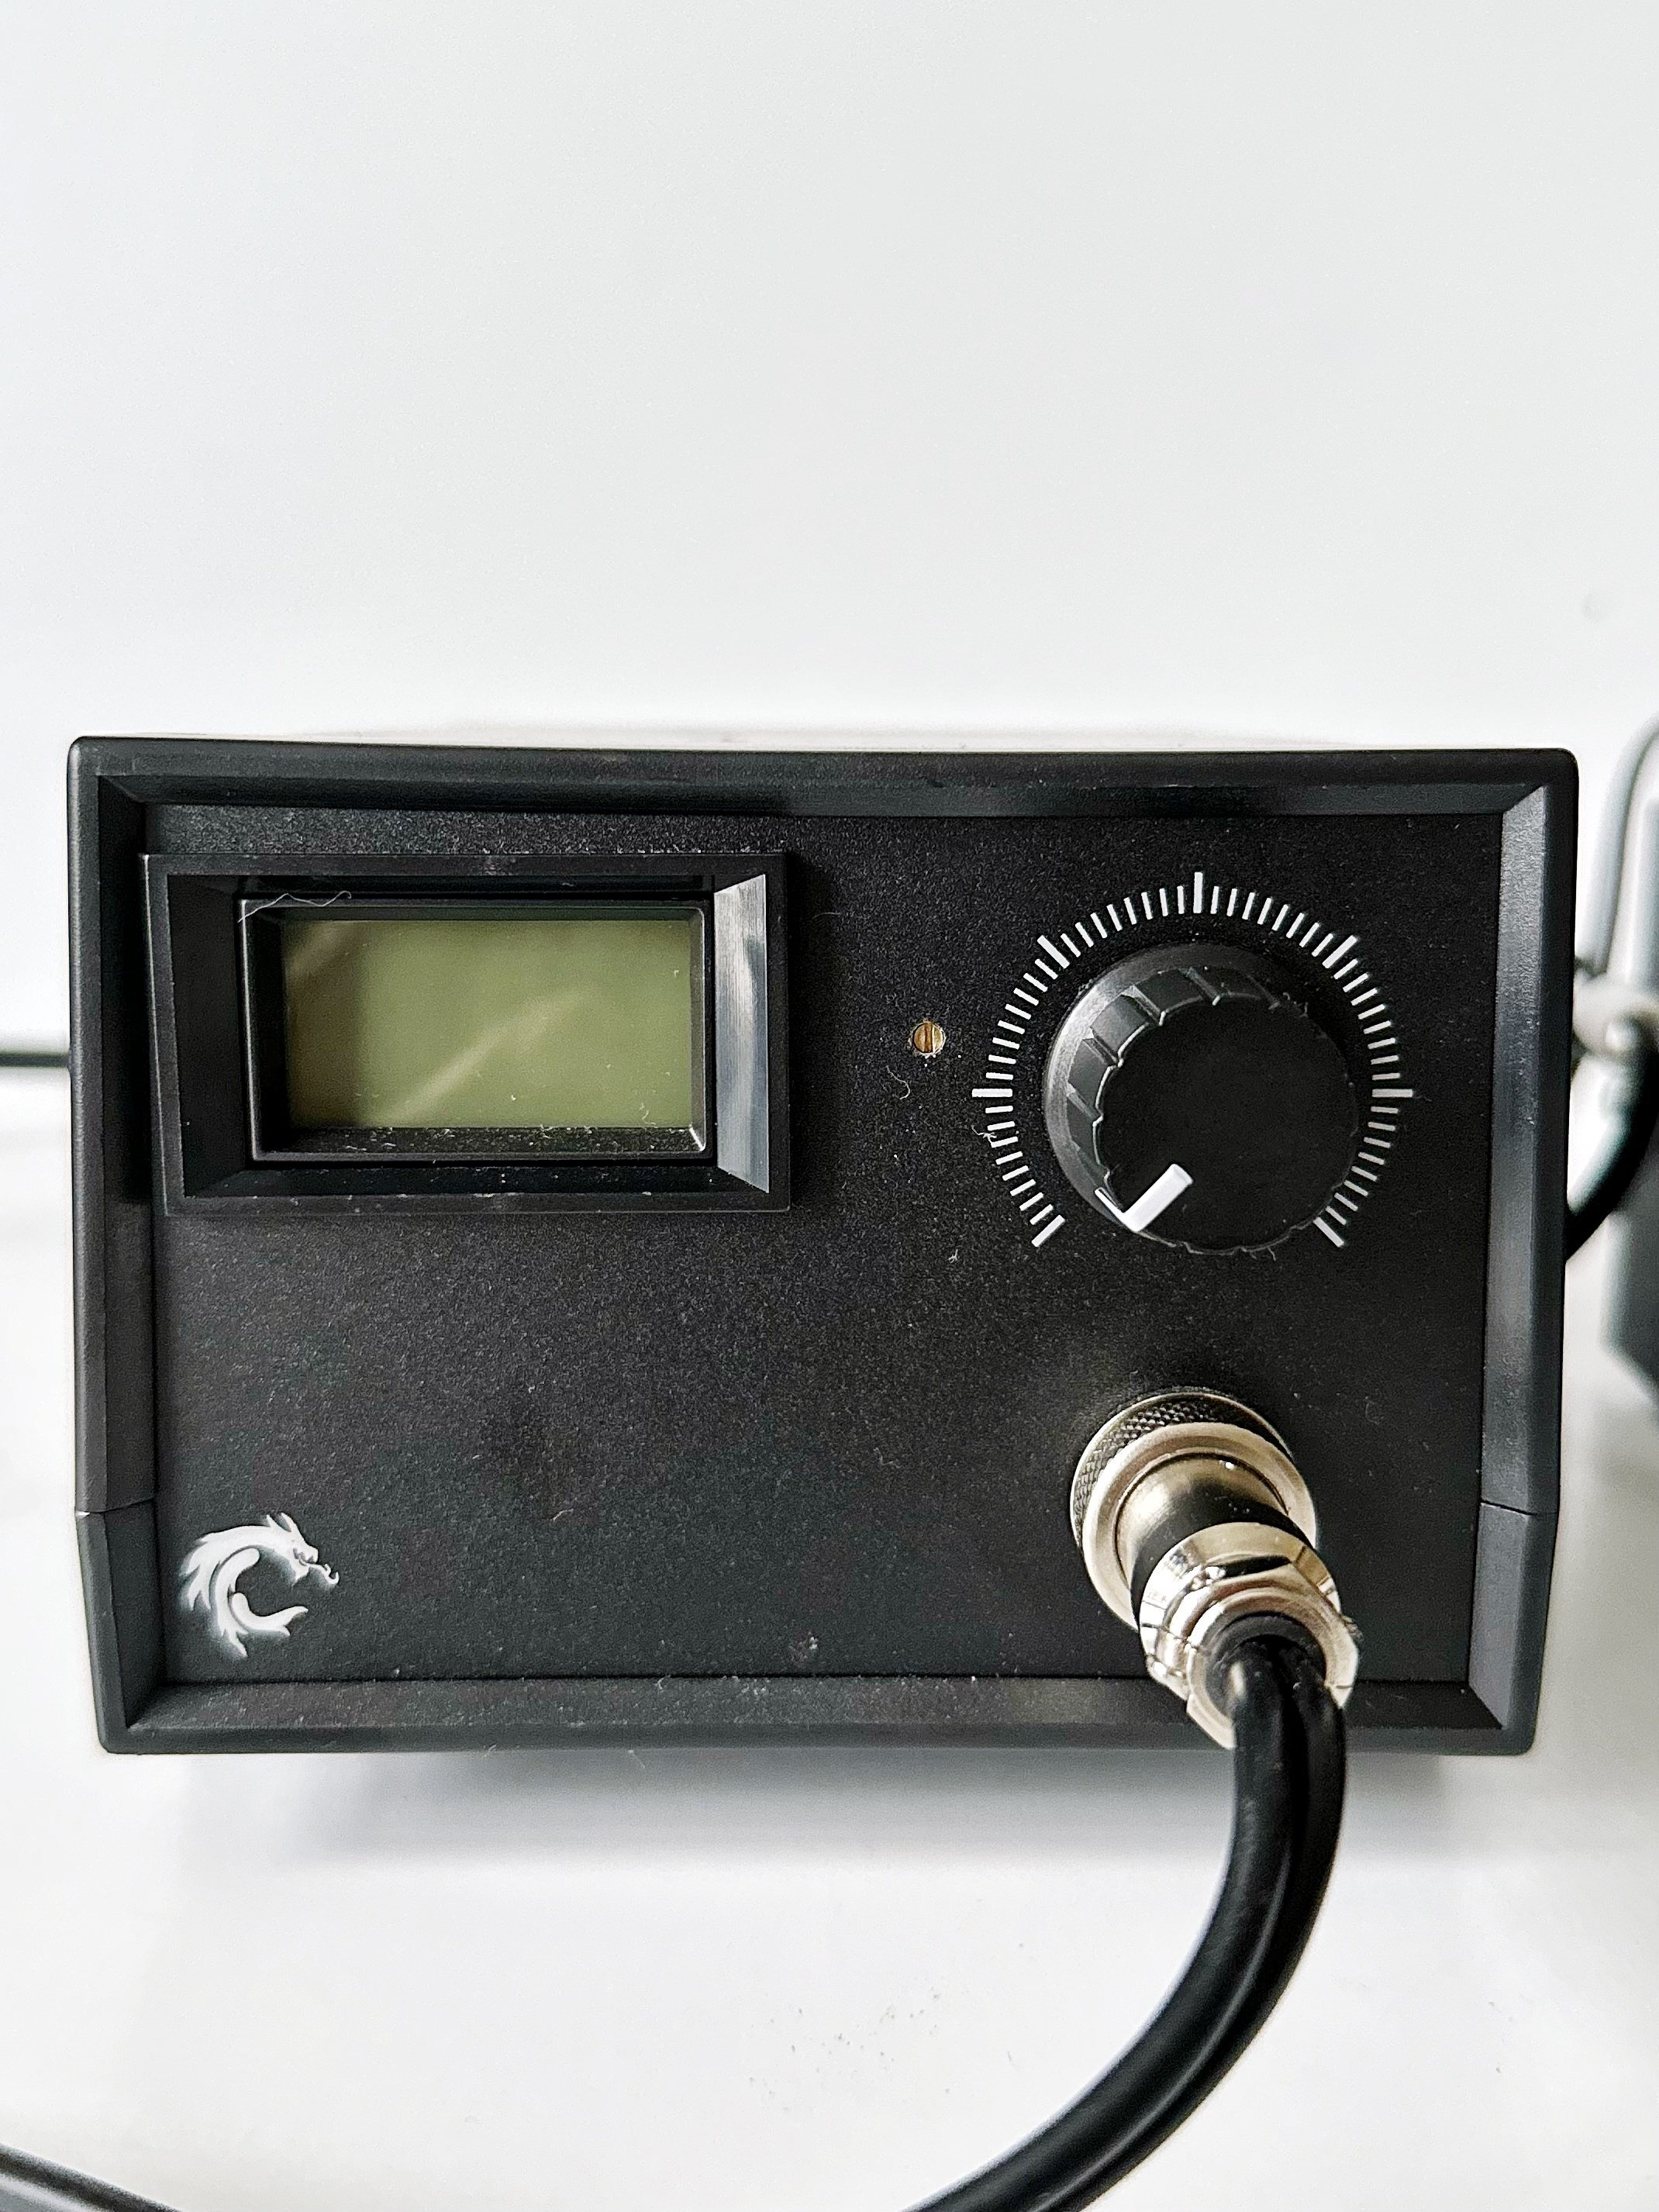

On the Truart, the digital screen allows you to pinpoint the heat setting the device is operating at. The Colwood Detailer has a dial instead that ranges from 0 to 10.
So, what might that look like in practice?
If you need to leave and return to a project at a later date, while you could turn to an exact numeral on the Truart, with the Colwood, you’d likely have to approximate a bit if your setting did not fall on a whole number. Or, if you know you will be going back to that exact same project, you could just leave it on the setting you need before switching off as I did above. 😬
Extras
Another area of difference is the extras that come with the burners. For the Truart, it comes with a snazzy case with the cool logo on the front, filing tools, a brush, sponges, and a manual (not shown). The Detailer kit that I ordered came with wood blanks, a piece of denim, a piece of leather (which I burned attempting to figure out the proper heat setting, before I adjusted the trim pot), a cleaning cloth, 2 ounces tin aluminum oxide powder, and a manual (not shown).


I admit, I’ve not used much of the additional supplies of either just yet.
Plugs & Power Supply Needs
Last, but not least, the Truart cord has three prongs on its plug while the Detailer has two.

And this is the area that perplexes me….
Both are meant to only be used in 125v outlets (though Truart says to only use 110v, it’s considered synonymous with 125v). Initially, I thought maybe something was wrong with the electric in my room. But, we had it tested and it’s fine. However, between the two burners, the only one that works with consistent heat both in other areas of my house and in my room is the Detailer.
While I’d like for the Truart to work anywhere in my house, it just doesn’t-and I likely won’t use it everywhere in my house as I am still raising a young adult with special needs.
The best we can make of it is my room is on the same breakers as the kitchen in our house.
As you know, the kitchen tends to draw energy for multiple appliances, many of which are larger (the fridge, the oven, the dishwasher, etc.). This may be interfering with the performance of the Truart burner in that room since it works perfectly fine in an outlet on the other side of our house that is on a separate breaker.
On the other hand, once I adjusted the trim pot for the Detailer and found that I could then transfer foil at a heat setting of around 4.5 on its dial, it began to see much more use than the Truart.

Conclusion
I’ll reiterate, both work beautifully. One just tends to be fussier than the other.
If you are in the market for a burner, there are many on the market. I’ve even read where well-known calligrapher, Kestrel Montes of Ink Me This has used a Tekchic Wood Burning Kit for years with minimal fuss.
At the end of the day, it’s an investment. Do your research and see which one fits your needs best…There are other burners that could work for you. But, do yourself a favor and check the min/max temperature range suits the projects you want to do first.
And, if that doesn’t work out, get a back(up) burner too! 😉